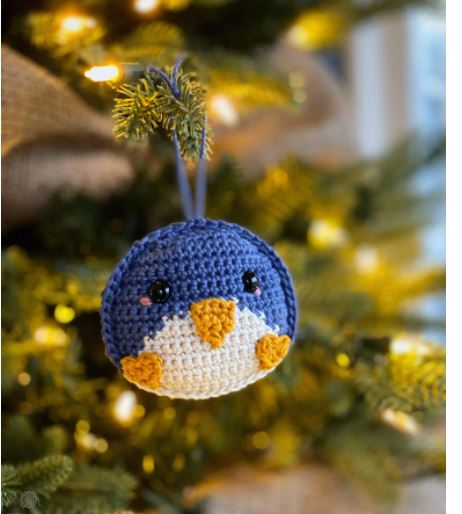
Hello friends, today’s starting pattern is the Christmas tree penguin ornament. Here’s how to make this pattern that will add a different elegance to your tree..
Materials:
- 3.25mm hook for main (I use these hooks!);
- Lion Brand 24-7 Cotton in Denim for main (less than 50g);
- Lion Brand 24-7 Cotton in Ecru for contrasting (small amounts);
- Lion Brand 24-7 Cotton in Goldenrod for beak and feet (small amounts);
- Any worsted weight yarn in pink for cheeks (teeny tiny amount);
- 10mm Safety Eyes;
- Stuffing;
- Tapestry needle.
Colour legend:
W – White
B – Blue
Terms and Stitches:
Ch – Chain
Slst – Slip stitch
Sc – Single Crochet (again, in rows with colour changes, sc stitches will be indicated with the Colour Legend letter instead of “sc”)
Inc – Increase. Work a regular sc increase
Dec – Decrease. Work a regular sc decrease
Pattern:
Front Body Panel:
You will make 1 panel using a 3.25mm hook. Start with White. The panel is worked from the bottom up. Ch 1 and turn at the end of each row unless specified otherwise.
Rows 1 to 5 are worked entirely in white.
Row 1: Ch 8, starting in second ch from hook, sc 7 (7 sts)
Row 2: Inc twice, sc 3, inc twice (11 sts)
Row 3: Inc twice, sc 7, inc twice (15 sts)
Row 4: Inc, sc 13, inc (17 sts)
Row 5: Inc, sc 15, inc (19 sts)
In the next row we will start the colour-work.
Row 6: B1, W17, B1 (19 sts)
Row 7: Binc, W17, Inc (21 sts)
Row 8: B3, W15, B3 (21 sts)
Row 9: B4, W13, B4 (21 sts)
Row 10: B5, W11, B5 (21 sts)
Row 11: B6, W9, B6 (21 sts)
Row 12: B8, W5, B8 (21 sts)
All remaining rows are worked entirely in blue.
Rows 13-14: Sc across (21 sts)
Row 15: Dec, sc 17, dec (19 sts)
Row 16: Sc across (19 sts)
Row 17: Dec, sc 15, dec (17 sts)
Row 18: Dec, sc 13, dec (15 sts)
Row 19: Dec twice, sc 7, dec twice (11 sts)
Row 20: Dec twice, sc 3, dec twice (7 sts)
Row 21: Dec, sc 3, dec (5 sts)
Tie off. Set aside for assembly later.
Back Body Panel:
Using 3.25mm hook and blue yarn. The back panel is worked exactly the same as the front panel except it’s worked entirely in blue without any colour-work.
Ch 1 and turn at the end of each row unless specified otherwise.
Row 1: Ch 8, starting in second ch from hook, sc 7 (7 sts)
Row 2: Inc twice, sc 3, inc twice (11 sts)
Row 3: Inc twice, sc 7, inc twice (15 sts)
Row 4: Inc, sc 13, inc (17 sts)
Row 5: Inc, sc 15, inc (19 sts)
Row 6: Sc across (19 sts)
Row 7: Inc, sc 17, inc (21 sts)
Rows 8-14: Sc across (21 sts)
Row 15: Dec, sc 17, dec (19 sts)
Row 16: Sc across (19 sts)
Row 17: Dec, sc 15, dec (17 sts)
Row 18: Dec, sc 13, dec (15 sts)
Row 19: Dec twice, Sc 7, dec twice (11 sts)
Row 20: Dec twice, sc 3, dec twice (7 sts)
Row 21: Dec, sc 3, dec (5 sts)
Tie off. Set aside for assembly later.
Beak:
In yellow yarn using a 3.25mm hook. Ch 1 and turn at the end of each row.
Row 1: Ch 5, starting in second ch from hook, sc 4 (4 sts)
Row 2: Dec twice (2 sts)
Row 3: Dec (1 st)
Tie off, leaving a long tail for stitching it on. Set aside for assembly later.
Feet (make 2):
Using 3.25mm hook and yellow yarn.
Row 1: Ch 2, sc 1 (1 st)
Row 2: 3 sc into the same st (3 sts)
Row 3: Dc in first st, slst in next, dc in last st, ch 1, slst in same st.
Tie off, leaving a long tail for stitching it on.
Move on to assembly below!

Assembly:
Step 1: Face
First, we need to attach and stitch on our facial features to the front panel.
Insert 10mm safety eyes into the front panel at row 15 and approximately 5 stitches in from each side.
Next, position the beak so that it is between the eyes, and lined up with the top of the belly. Stitch the beak in place using the long tail.
Finally, stitch the little feet onto each side of the belly and add some cheeks by stitching some pink yarn around a stitch under each eye a couple of times.
Step 2: Body
Okay, here are the pieces you should now have at this step.
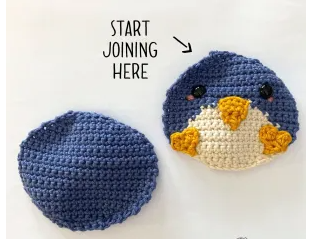
Place the two body panels together, matching up all sides and colours.
Make sure the front of your Penguin is facing you as you crochet around the outside of the piece.
Starting on the left side at the top, begin attaching the panels together by single crocheting around the outside of the panels starting in blue.
Be sure to crochet loosely around so that the edge keeps it’s nice curve!
Crochet down to the top of the belly. Change colours to white.
Continue single crocheting around the bottom. Switch back to blue when necessary.
Continue crocheting up the other side and stop when you reach the top. Stuff your penguin!
Continue single crocheting across the top. Top up stuffing as you go as necessary. Use the back of your crochet hook to even out the stuffing and keep the shape nice and round.
When you are satisfied with the stuffing, close with a slst to first st. Tie off. With your tapestry needle, poke the yarn tail back inside the piece. Finish with some needle sculpting for the eyes, add the loop for hanging, and you’re done!