Hello friends, now I will share this cute cake mold. Here you go, let’s see how it is made..
Materials:
- Hook 3 mm
- Yarn
- Filler
- Needle
- Bulky paint or safety eyes
- If you don’t like stitching parts, then you need a hot glue gun.
I have used Schachenmayr Catania, Catania Color and Micro yarns, but you can use any. Just choose the right hook size.
Legend:
conn. Art. – connecting column
skip – skip the loop
vp – air loop
sbn – single
crochet psn – half
-column ssn – double
crochet adding. – increase increase
decrease. – decrease
zzs – behind the back wall of the
zps loop – behind the front wall of the
wm2psn loop – 2 psn, knitted together
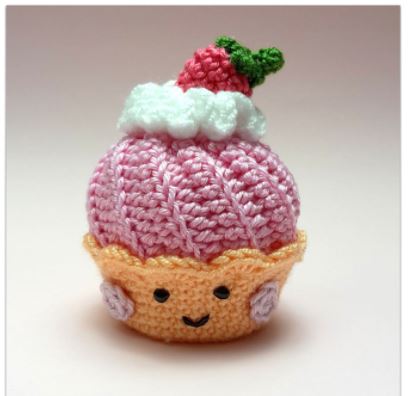
Cake:
1 row: 6 sc in the amigurumi ring, connect, 1 vp (6)
2 row: 2 sc in each. loop, connect, 1 ch (12)
3 row: 2 sbn in the first. loop, sc in the next., repeat to the end of the row, connect, 1 ch (18)
4 row: 2 sc in the first. loop, sc in the next. 2, repeat to the end of the row, connect, 1 ch (24)
5 row: 2 sc in the first. loop, sc in the next. 3, repeat to the end of the row, connect, 1 ch (30)
6 row: 2 sc in the first. loop, sc in the next. 4, repeat to the end of the row, connect, 1 ch (36)
7 row: zzs, 36 sc to the end of the row, connect, 1 ch (36)
8-10 row: tie 36 sc to the end of the row, connect, 1 ch (36 )
11 row:2 sc in the first. loop, sc in the next. 5, repeat to the end of the row, connect, 1 ch (42)
12-13 row: 42 sc to the end of the row, connect, 1 ch (42)
14 row: * skip, 4 psn in the next. loop, pass, conn. st. * repeat ** to the end of the row, connect and secure the thread.

Glazing:
Tie a chain of 18 ch
1 row: skip first. 2 loops, (2 psn), psn in the next 13 loops, vm2psn, 2 vp, turn (16)
Next, knit zzs, except for the first and last loops of each row
2 row: vm2psn, 13 psn, (2psn)
3 row: (2psn), 13 psn, vm2psn
4-22 row: repeat Row 2 + 3 (end row 2)

Connect row 1 to row 22 by knitting a connection. Art. behind the back walls of the hinges, forming a pipe. Of course, you can sew the 2 pieces together, but the texture when stapled together. columns looks more interesting. Leave a small end of the thread to tighten the pipe. Now turn it out.
Look at the photo how to pull off the edge of the pipe. Draw the thread with the needle through the row.
When you pull on one side, fill the frosting with filler. Then pull off the other side.


Cream decoration:
1 row: 6 sc in the amigurumi ring, connect, 1 vp (6)
2 row: 2 sc in each. loop, connect, 1 ch (12)
3 row: 2 sbn in the first. loop, sbn in the next., repeat to the end of the row, connect, 1 ch (18)
4 row: zps 5 psn in each. loop to the end of the row, connect, fasten the thread.

Cheeks:
1 row: 7 sc in an amigurumi ring, connect, fasten the thread (7)
Tie 2 parts.

Fruits
Strawberry:
1 row: 5 sc in the amigurumi ring, connect, 1 ch (5)
2 row: sc in each. loop to the end of the row, connect, 1 ch (5)
3 row: 2 sc in each. loop, connect, 1 ch (10)
4 row: sbn in each. loop to the end of the row, connect, 1 ch (10)
5 row: 2 sbn in the first. loop, sc in the next. 1, repeat to the end of the row, connect, 1 ch (15)
6 row: sc in each. loop to the end of the row, connect, 1 ch (15)
7 row: decrease, sbn in the next. repeat to the end of the row, connect, 1 ch (10)
8 row: decrease. to the end of the row, connect, fasten the thread (5)
Peduncle:
1 row: 5 sc in amigurumi ring, connect, (5)
2 row: * 2 VP, conn. Art. in the 2nd run from the hook, conn. Art. in the next * repeat 4 more times
3 row: 4 VP, sbn in the 2nd VP from the hook and in the last. 2 ch, fasten the thread
Pull the thread through the middle of the amigurumi ring and the stalk is ready, you can attach it to the strawberry.

