
Hello friends, our current model is a model that you will all love. Let’s see how this model is made..
- MATERIALS:
- Acrylic yarn, DK/Worsted Weight: Red, Brown, White and Peach Colors
- Fuzz-A-Fleece Yarn, White; or equivalent. approximately 2 yard
- Styrofoam Polystyrene Ball, 2.5″ Diameter
- Styrofoam Polystyrene Ball, 0.75″ Diameter
- Jingle Bell
- Polyester fiberfill
- Snowflakes
- Wood Slice (As A Stand)
TOOLS
- 3mm hook
- Tapestry Needle
- Hot Glue Gun
ABBREVIATIONS
sc: single crochet
inc: 2sc, increase
GNOME HAT
With Red Yarn:
Round 1: sc 3 in magic ring. {3}
Round 2: [inc] around. {6}
Round 3: sc around. {6}
Round 4: [sc, inc] around. {9}
Round 5: sc around. {9}
Round 6: [sc, inc, sc] around. {12}
Round 7: sc around. {12}
Round 8: [sc3, inc] around. {15}
Round 9: sc around. {15}
Round 10: [sc2, inc, sc2] around. {18}
Round 11: sc around. {18}
Round 12: [sc5, inc] around. {21}
Round 13: sc around. {21}
Round 14: [sc3, inc, sc3] around. {24}
Round 15: sc around. {24}
Round 16: [sc7, inc] around. {27}
Round 17: sc around. {27}
Round 18: [sc4, inc, sc4] around. {30}
Round 19: sc around. {30}
Round 20: [sc9, inc] around. {33}
Round 21: sc around. {33}
Round 22: [sc5, inc, sc5] around. {36}
Round 23: sc around. {36}
Round 24: [sc11, inc] around. {39}
Round 25: sc around. {39}
Round 26: [sc6, inc, sc6] around. {42}
Round 27: sc around. {42}
Round 28: [sc13, inc] around. {45}
Round 29: sc around. {45}
Round 30: [sc7, inc, sc7] around. {48}
Round 31: sc around. {48}
Round 32: [sc15, inc] around. {51}
Round 33: sc around. {51}
Round 34: [sc8, inc, sc8] around. {54}
Round 35: sc around. {54}
Round 36: [sc17, inc] around. {57}
Round 37: sc around. {57}
Round 38: [sc9, inc, sc9] around. {60}
Round 39: sc around. {60}
Round 40: [sc19, inc] around. {63}
Round 41: sc around. {63}
Round 42: [sc10, inc, sc10] around. {66}
Round 43: sc around. {66}
Fasten and weave in ends
GNOME BODY
Begin with brown yarn. This pattern is made by joining two leg pieces together.
To make the first leg piece:
Round 1: Sc 8 in magic ring. {8}
Round 2: [inc] around. {16}
Round 3-5: Sc around. {16}
Fasten off and leave a long end for sewing.
To make the second leg piece:
Round 1: Sc 8 in magic ring. {8}
Round 2: [inc] around. {16}
Round 3-5: Sc around. {16}
Round 6: This will be where the two pieces join. Sc in the next 8 sts, then continues to sc in the first leg piece’s sts. When you reach back to the second leg piece, sc in the remaining sts {32}. (you may use excess yarn from the first piece to tighten any gaps between the two pieces)
Change yarn to white:
Round 7: Sc around. {32}
Change yarn to red:
Round 8 – 13: Sc around. {32}
Fasten off and leave a long end.
Stuff body firmly. Sew the top opening closed flat using the long end.
Don’t cut the long end. Reserve it for sewing the jingle bell.
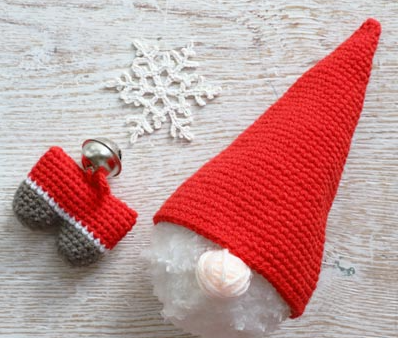
DETAILS ON HOW TO ASSEMBLE THE AMIGURUMI GNOME
- Wrap the bigger styrofoam ball with white fuzzy yarn; this is the head of the gnome.
Wrap the smaller ball with peach yarn; this is the nose of the gnome.
Glue the ends and part of the yarns with hot glue while wrapping.
First, wrap the yarn on a styrofoam ball by gluing the yarn end on the ball with a dot of hot glue. Wind or wrap the yarn around the ball and apply glue intermittently, so the yarn stays in place. As you wind the yarn, be sure to twist the ball around to distribute the yarn evenly.
Without styrofoam balls? You may also wind a ball of yarn without a styrofoam ball. It is just like you wind your stashed yarn into a ball. However, make sure they are tightly wound and won’t come loose. As you wind, glue the yarn intermittently, so the yarn stays in place.
2.Crochet the Red Hat, Body, and the Snowflake motif. Gather jingle bell and tapestry needle with a short length of red yarn.
The hat should be slightly bigger than the head (together with the nose). If your hat is smaller, you probably need to add another few crochet rounds to make it bigger.
3.Tie a Dangling jingle bell on the body by bringing the yarn to the middle top and sew a dangling jingle bell.
4.To assemble the gnome, glue the nose to the head with a hot glue gun.
Then glue the hat to the head. You may stuff the hat with some polyfill; this will give a better shape to the hat.
Squeeze about 2″ length of hot glue inside and near the edge of the hat.
Insert less than half of the head into the hat and glue the back of the head to the hat.
This is how it looks like after gluing the hat to the back of the head. Pull the hat to cover the nose a little and glue it on.
Followed by gluing the sides until the hat is securely “sit” on the head.
Glue the snowflake embellishment onto the hat. This is my famous snowflake crochet pattern that you can crochet with white lace thread.

Next, glue the body to the bottom center of the head. If the wrapped yarn at the head is floating in this area, squeeze some hot glue to adhere the yarn to the styrofoam before gluing the body to that area.

The Christmas gnome is completed. You may tie a string to the tip of the hat to make a hanging ornament.


